Attention is All you Need
Google 2017 NIPS | 从代码的角度详细解读Transformer
Transformer
提出基础模型Transformer,相较于CNN和RNN,采用Attention的机制
本论文主要基于NLP的机器翻译的任务,但后续例如ViT、GPT等研究证明了其在领域、任务上都能够很好的使用,代码来自1
Encoder-Decoder
The dominant sequence transduction models are based on complex recurrent or convolutional neural networks that include an encoder and a decoder.
主流的序列转录 (sequence transduction) 模型都采用基于基于卷积或者循环的神金网络结构
序列转录模型典型的任务就是翻译任务,如论文实验中的英语-德语翻译任务
在图像领域,也有”转录模型“,例如风格迁移。在风格迁移中,Encoder通常是多层的卷积模型,将通道增加,特征的宽度减小。而Decoder通常也是多层卷积,但会将多通道最终降低到RBG的三通道,特征的宽度也变为一开始的图像大小
基本结构
这是个最简单的结构:只有一个encoder,一个decoder
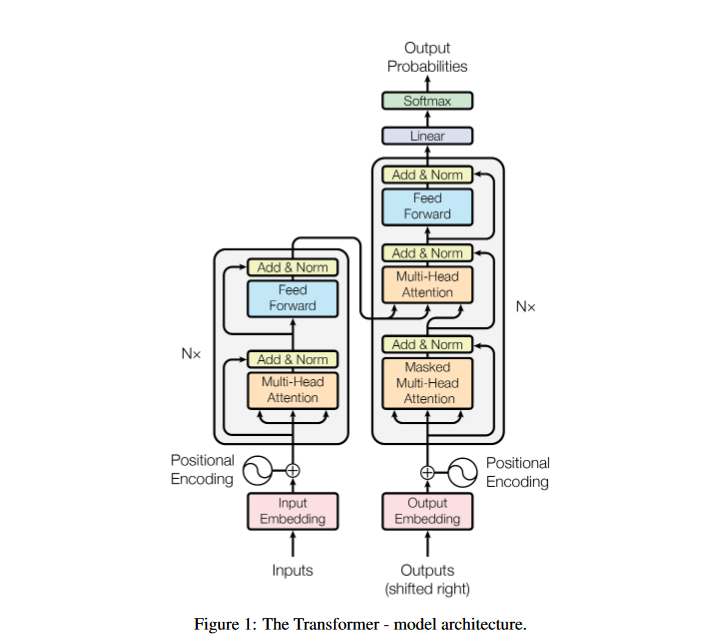
在具体的模型中,论文采用了N为6的Encoder和Decoder架构,每一层Decoder多头注意力机制的输入都为最后一层Encoder的输出,代码中直接使用Clone函数进行ModuleList的模型定义
1
2
3
def clones(module, N):
        "Produce N identical layers."
        return nn.ModuleList([copy.deepcopy(module) for _ in range(N)])
除了Encoder与Decoder,结构还包括Input Embeding、Output Embeding、Generator (Linear和Softmax部分)
1
2
3
4
5
6
7
8
9
10
11
12
13
14
15
16
17
18
19
20
21
22
23
class EncoderDecoder(nn.Module):
       """
       A standard Encoder-Decoder architecture. Base for this and many
       other models.
       """
       def __init__(self, encoder, decoder, src_embed, tgt_embed, generator):
           super(EncoderDecoder, self).__init__()
           self.encoder = encoder
           self.decoder = decoder
           self.src_embed = src_embed
           self.tgt_embed = tgt_embed
           self.generator = generator

       def forward(self, src, tgt, src_mask, tgt_mask):
           "Take in and process masked src and target sequences."
           return self.decode(self.encode(src, src_mask), src_mask,
                               tgt, tgt_mask)

       def encode(self, src, src_mask):
           return self.encoder(self.src_embed(src), src_mask)

       def decode(self, memory, src_mask, tgt, tgt_mask):
           return self.decoder(self.tgt_embed(tgt), memory, src_mask, tgt_mask)
Encoder与Decoder只是基础的结构,Transformer更重要的是在Encoder和Decoder中使用的是非卷积和循环的注意力机制
Input Embeding 词嵌入
比较简单的部分,就是将词序列(toekn)转为词向量,词向量的大小d_model=512
直接通过nn.Embeding实现。在实验中,对于英语和德语他们采用一个Embeding,即Shared Embeding,才推荐系统中也是常用的方式
1
2
3
4
5
6
7
8
class Embeddings(nn.Module):
       def __init__(self, d_model, vocab):
           super(Embeddings, self).__init__()
           self.lut = nn.Embedding(vocab, d_model)
           self.d_model = d_model

       def forward(self, x):
           return self.lut(x) * math.sqrt(self.d_model)
通过Forward可以看出,Embeding还需要乘上特征的维度 $\sqrt{d\_model}$
原因:Embeding通常会将词向量映射的值较小,乘上 $\sqrt{d\_model}$ 相当于做尺度变换,使词向量的值相对positional encoding的值大 2
Positional Encoding 位置编码
注意力机制计算的是全局词向量之间的权重,与句子中词的顺序没有关联。而位置编码就是将输入进行”编码“,将特定位置上的词向量加上一个特定位置的值,即加入时序信息,作者采用的是正弦编码
\[PE_{(pos,2i)}=sin(pos/10000^{2i/d_{\mathrm{model}}})\\PE_{(pos,2i+1)}=cos(pos/10000^{2i/d_{\mathrm{model}}})\]作者在论文中也尝试了Positional Embeding (Learned Positional Encoding)进行位置编码,结果没有明显的差异
1
2
3
4
5
6
7
8
9
10
11
12
13
14
15
16
17
18
19
20
class PositionalEncoding(nn.Module):
       "Implement the PE function."
       def __init__(self, d_model, dropout, max_len=5000):
           super(PositionalEncoding, self).__init__()
           self.dropout = nn.Dropout(p=dropout)

           # Compute the positional encodings once in log space.
           pe = torch.zeros(max_len, d_model)
           position = torch.arange(0, max_len).unsqueeze(1)
           div_term = torch.exp(torch.arange(0, d_model, 2) *
                                -(math.log(10000.0) / d_model))
           pe[:, 0::2] = torch.sin(position * div_term)
           pe[:, 1::2] = torch.cos(position * div_term)
           pe = pe.unsqueeze(0)
           self.register_buffer('pe', pe)

       def forward(self, x):
           x = x + Variable(self.pe[:, :x.size(1)],
                            requires_grad=False)
           return self.dropout(x)
Encoder
将词嵌入与位置编码相加后,数据正式输入到Encoder中。
Encoder包括几个特别的结构:
- 多头注意力机制 - Multi-Head Attention
- 残差连接与LayerNorm - Add & Norm
- 多层感知机 - Feed Forward
1
2
3
4
5
6
7
8
9
10
11
12
class Encoder(nn.Module):
       "Core encoder is a stack of N layers"
       def __init__(self, layer, N):
           super(Encoder, self).__init__()
           self.layers = clones(layer, N)
           self.norm = LayerNorm(layer.size)

       def forward(self, x, mask):
           "Pass the input (and mask) through each layer in turn."
           for layer in self.layers:
               x = layer(x, mask)
           return self.norm(x)
多头注意力机制
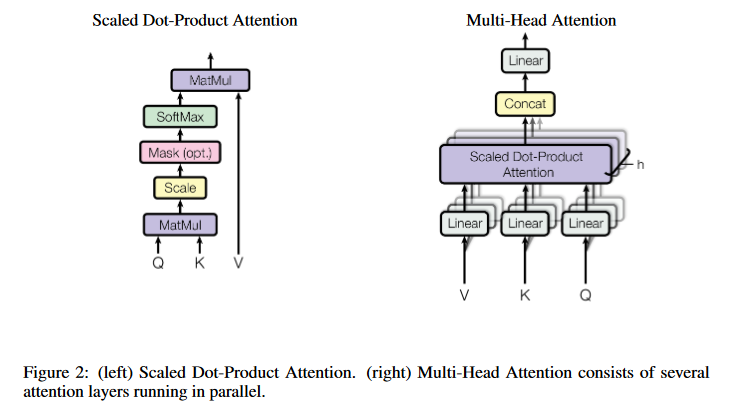
注意力机制
在弄懂多头注意力机制之前,先要理解注意力机制
\[\text{Attention}(Q,K,V)=\text{softmax}(\frac{QK^T}{\sqrt{d_k}})V\]1
2
3
4
5
6
7
8
9
10
11
def attention(query, key, value, mask=None, dropout=None):
"Compute 'Scaled Dot Product Attention'"
d_k = query.size(-1)
scores = torch.matmul(query, key.transpose(-2, -1)) \
/ math.sqrt(d_k)
if mask is not None:
scores = scores.masked_fill(mask == 0, -1e9)
p_attn = F.softmax(scores, dim = -1)
if dropout is not None:
p_attn = dropout(p_attn)
return torch.matmul(p_attn, value), p_attn
注意力机制的实现可以很多种,例如点积(Dot-Product)、加型注意力(additive attention),Transformer中使用的为Scaled Dot-Product Attention,其实就是点积,但除了一个维度。
为什么要除根号 $d_k$ ?
- 当dk比较大的时候,两个矩阵的点积可能会比较大,然后经过softmax出现极化,导致梯度比较小,导致反向传播比较快
- 除以根号dk使得 Q*K 的结果满足期望为0,方差为1的分布,起到了归一化的作用
如何理解QKV?
Q点乘K的转置类似于余弦相似度,如果积的值越大,说明其对于V的权重越大,再成V就使得V对应位置的值更大
Query,查询,可以理解为要查询的向量
Key,钥匙,可以理解”标准”的向量
如果查询与标准越相近,那么权重值就越大,最后作用与Value上就表示越重要
对于统一个标准,不同的查询自然有不同的权重,进而产生不同的权重值
Mask
在Decoder的模块中才使用。是为了掩膜掉下一个时刻的结果,即t时刻的Query,只看t时刻和之前的信息
这里将mask放到Scaled之后,即保证了并行计算,又能够保证softmax后的和仍然为1
具体而言,是将需要mask的地方设为一个特别大的数,使其softmax后为0,代码中可以看见为-1e9
多头注意力机制
单个的注意力机制就是直接根据QKV得到,而多头的注意力机制可以建立多种投影(位置)关系,每个头关注不同维度的语义信息,使得模型的表达更加丰富。如Figure 2,将QKV进行 h 个头的投影(Linear),再进行注意力机制,最终拼接再通过线性层
\[\mathrm{MultiHead}(Q,K,V)=\mathrm{Concat}(\mathrm{head}_{1},...,\mathrm{head}_{\mathrm{h}})W^{O}\\\mathrm{where~head_{i}}=\Lambda\mathrm{ttention}(QW_{i}^{Q},KW_{i}^{K},VW_{i}^{V})\]公式中 $W_i$ 就代表一个投影的变化,其实就是Figure 2中的线性层,那么对于8个头,就分别有8个QKV的矩阵
1
2
3
4
5
6
7
8
9
10
11
12
13
14
15
16
17
18
19
20
21
22
23
24
25
26
27
28
29
30
31
32
class MultiHeadedAttention(nn.Module):
       def __init__(self, h, d_model, dropout=0.1):
           "Take in model size and number of heads."
           super(MultiHeadedAttention, self).__init__()
           assert d_model % h == 0
           # We assume d_v always equals d_k
           self.d_k = d_model // h
           self.h = h
           self.linears = clones(nn.Linear(d_model, d_model), 4)
           self.attn = None
           self.dropout = nn.Dropout(p=dropout)

       def forward(self, query, key, value, mask=None):
           "Implements Figure 2"
           if mask is not None:
               # Same mask applied to all h heads.
               mask = mask.unsqueeze(1)
           nbatches = query.size(0)

           # 1) Do all the linear projections in batch from d_model => h x d_k
           query, key, value = \
               [l(x).view(nbatches, -1, self.h, self.d_k).transpose(1, 2)
                for l, x in zip(self.linears, (query, key, value))]

           # 2) Apply attention on all the projected vectors in batch.
           x, self.attn = attention(query, key, value, mask=mask,
                                    dropout=self.dropout)

           # 3) "Concat" using a view and apply a final linear.
           x = x.transpose(1, 2).contiguous() \
                .view(nbatches, -1, self.h * self.d_k)
           return self.linears[-1](x)
在代码中可以看到,并没有出现8个QKV的线性层。这是因为8词矩阵乘法的concatenation实际可以通过一次实现
代码self.linears = clones(nn.Linear(d_model, d_model), 4) 创造了三个线性层,都是512*512的,其中前三个就是QKV的8个头的映射矩阵,最后一个为多头注意力最后的Linear
当h为8时, d_k 为64,所以每个头的矩阵大小应该是512 * 64 的矩阵,这里直接使用512 * 512的矩阵,并行实现了一样的结果。
1
2
3
query, key, value = \
            [l(x).view(nbatches, -1, self.h, self.d_k).transpose(1, 2)
             for l, x in zip(self.linears, (query, key, value))]
就是 $QW_{i}^{Q},KW_{i}^{K},VW_{i}^{V}$ 的过程,最后再通过Attention
残差连接和Layer Norm
残差连接
与ResNet中一样,可以有效防止梯度消失,在代码中的体现为
1
2
3
4
5
6
7
8
9
10
11
12
13
14
15
16
17
18
19
20
21
22
23
24
25
26
class SublayerConnection(nn.Module):
       """
       A residual connection followed by a layer norm.
       Note for code simplicity the norm is first as opposed to last.
       """
       def __init__(self, size, dropout):
           super(SublayerConnection, self).__init__()
           self.norm = LayerNorm(size)
           self.dropout = nn.Dropout(dropout)

       def forward(self, x, sublayer):
           "Apply residual connection to any sublayer with the same size."
           return x + self.dropout(sublayer(self.norm(x)))
class EncoderLayer(nn.Module):
       "Encoder is made up of self-attn and feed forward (defined below)"
       def __init__(self, size, self_attn, feed_forward, dropout):
           super(EncoderLayer, self).__init__()
           self.self_attn = self_attn
           self.feed_forward = feed_forward
           self.sublayer = clones(SublayerConnection(size, dropout), 2)
           self.size = size

       def forward(self, x, mask):
           "Follow Figure 1 (left) for connections."
           x = self.sublayer[0](x, lambda x: self.self_attn(x, x, x, mask))
           return self.sublayer[1](x, self.feed_forward)
Encoder Layer就代表一层Encoder,最后的make model会通过
1
Encoder(EncoderLayer(d_model, c(attn), c(ff), dropout), N),
定义6个Encoder Layer的Encoder部分
通过Encoder Layer的forward可以看到,Encoder的QKV都是自生( self.self_attn(x, x, x, mask) )。经过多头主力已之后的结果会forward进sublayer[0],同x进入第一个残差结构,并进行Add & Norm模块,输出赋值为x,在进行Feed Forward和Add & Norm
注意这里sublayer传入的是x和一个function
Layer Norm
相比于BatchNorm在通道上做归一化,Layer Norm可以理解为在每个句子上做归一化
对于图像而言,例如输入维度为8 (Batch Size) *3*256*256,BatchNorm计算每个通道,即3的维度上当前Batch的均值与方差
LayerNorm通常用于序列数据,例如输入维度为8*16 (句子长度) * 512 (词向量的维度),LayerNorm计算每句话的均值与方差,在8的那个维度上计算
这是因为:
1、在时序数据中,句子的长度更加灵活,有的很长有的很短。在小批量的数据下,均值方差的抖动会比较大
2、在CV数据中,每个通道对应一个特征(颜色、纹理等),那么一个特征的分布应当理解为同分布的。但对于句子而言,一个句子对应一个上下文(一种语义),应该认为一句话是同分布的
因此,通过代码来看,LayerNorm也不需要保存训练集的全局均值和方差,相当于只保存了BatchNorm中的gamma和beta
1
2
3
4
5
6
7
8
9
10
11
12
class LayerNorm(nn.Module):
       "Construct a layernorm module (See citation for details)."
       def __init__(self, features, eps=1e-6):
           super(LayerNorm, self).__init__()
           self.a_2 = nn.Parameter(torch.ones(features))
           self.b_2 = nn.Parameter(torch.zeros(features))
           self.eps = eps

       def forward(self, x):
           mean = x.mean(-1, keepdim=True)
           std = x.std(-1, keepdim=True)
           return self.a_2 * (x - mean) / (std + self.eps) + self.b_2
多层感知机
这里的Feed Forward就是两层的MLP,使用ReLU作为激活函数,具体的隐藏层大小是先扩大为两倍再还原
\[\mathrm{FFN}(x)=\max(0,xW_1+b_1)W_2+b_2\]1
2
3
4
5
6
7
8
9
10
class PositionwiseFeedForward(nn.Module):
"Implements FFN equation."
def __init__(self, d_model, d_ff, dropout=0.1):
super(PositionwiseFeedForward, self).__init__()
self.w_1 = nn.Linear(d_model, d_ff)
self.w_2 = nn.Linear(d_ff, d_model)
self.dropout = nn.Dropout(dropout)
def forward(self, x):
return self.w_2(self.dropout(F.relu(self.w_1(x))))
Decoder
Decoder的结构类似于Encoder,不同之处有
- 第一个多头注意力机制采用Mask进行掩膜
- 第二个多头注意力机制的K和V为最后一个Encoder的输出
- 两个注意力机制后接MLP
1
2
3
4
5
6
7
8
9
10
11
12
13
14
15
16
17
18
19
20
21
22
23
24
25
26
27
class Decoder(nn.Module):
    "Generic N layer decoder with masking."
    def __init__(self, layer, N):
        super(Decoder, self).__init__()
        self.layers = clones(layer, N)
        self.norm = LayerNorm(layer.size)

    def forward(self, x, memory, src_mask, tgt_mask):
        for layer in self.layers:
            x = layer(x, memory, src_mask, tgt_mask)  #这里都memory即为Encoder的输出
        return self.norm(x)
class DecoderLayer(nn.Module):
    "Decoder is made of self-attn, src-attn, and feed forward (defined below)"
    def __init__(self, size, self_attn, src_attn, feed_forward, dropout):
        super(DecoderLayer, self).__init__()
        self.size = size
        self.self_attn = self_attn
        self.src_attn = src_attn
        self.feed_forward = feed_forward
        self.sublayer = clones(SublayerConnection(size, dropout), 3)

    def forward(self, x, memory, src_mask, tgt_mask):
        "Follow Figure 1 (right) for connections."
        m = memory
        x = self.sublayer[0](x, lambda x: self.self_attn(x, x, x, tgt_mask))
        x = self.sublayer[1](x, lambda x: self.src_attn(x, m, m, src_mask)) #KV传入memory
        return self.sublayer[2](x, self.feed_forward)
Make Model
1
2
3
4
5
6
7
8
9
10
11
12
13
14
15
16
17
18
19
20
21
def make_model(src_vocab, tgt_vocab, N=6,
               d_model=512, d_ff=2048, h=8, dropout=0.1):
    "Helper: Construct a model from hyperparameters."
    c = copy.deepcopy
    attn = MultiHeadedAttention(h, d_model)
    ff = PositionwiseFeedForward(d_model, d_ff, dropout)
    position = PositionalEncoding(d_model, dropout)
    model = EncoderDecoder(
        Encoder(EncoderLayer(d_model, c(attn), c(ff), dropout), N),
        Decoder(DecoderLayer(d_model, c(attn), c(attn),
                             c(ff), dropout), N),
        nn.Sequential(Embeddings(d_model, src_vocab), c(position)),
        nn.Sequential(Embeddings(d_model, tgt_vocab), c(position)),
        Generator(d_model, tgt_vocab))

    # This was important from their code.
    # Initialize parameters with Glorot / fan_avg.
    for p in model.parameters():
        if p.dim() > 1:
            nn.init.xavier_uniform(p)
    return model
参考资料